Modifying a NEX7 with a hardwire shutter release jack
Posted by Mark Kirschenbaum on
This article will cover how to add an hardwired shutter remote 2.5mm jack to a Sony NEX7 Camera. This jack will allow you to fire a NEX-7 continuously and precisely with an external pocket wizard, tongue switch, timer, etc. The mod is a lot easier than the Sony NEX-5 but it takes just as much time to make it look pretty. You will need:
- #0 Philips screw driver
- 2.5mm jack. Used here is a "CONN AUDIO JACK 2.5MM STEREO SMD - SJ-2523-SMT" found at Digi-Key for $1.26.
- Rework / wire winding wire. 28-32awg
- Small pitch soldering tools (tweezers, iron, flux, isopropanol, solder)
- Crazy glue, tooth picks and some patience
- Plastic epoxy (5 or 1 minute) NOTE: it still takes a few hours to fully harden)
- Masking tape and pen to note where screws came from
- Clean, dust free area

Above is how the camera looks after the mod is completed.
The first step is to remove the lens and use some gaffers tape or the original cover to cover up the sensor. Its also a good time to take out the battery and put down a lint free towel to work on.

Now remove the screws found within the flash compartment. There are three.

I personally use a piece of tape and mark where all the screws come from. This prevents me from leaving out a screw or forgetting where they go and what size goes where.

Next step is to remove the three screws in the battery compartment. Two deep and one on the lip there.

Now remove the one screw next to the neck strap tie down and then one under the usb access port.

Now the two screws on the bottom base. You do not need to remove the scew below the 1/4 - 20 tripod mount nor on the screen.

The top comes right off. Slowly pull it up as to not rip off the leads. Use your tweezers to slowly pull the blue fpc connector out. I use the tweezer tips on the little tab and alternate between each side moving it straight out the connector a bit at a time. If you crease this connector you just ruined the camera!
The red and yellow flash connector just pull straight up. You can use mini pliers to pull them up if needed. Do not pull by the wire! Also, be careful, I'm sure there is high voltage here! (feels like a tazzer if you do!)

Put the camera on AF/MF mode vs. AEL. Then pull out the screen and point it towards the top of the camera (flash/shutter button). The back half now pulls off towards the back. You have to angle it 45 degrees to get it over the screen. Also notice the distance between this half and the body since this is how much slack you will need in your wire leads if you mount the jack where I did.

This is how the camera looks when its ready for the mod.

Another view

Solder on the rework wire as shown above. I think I used around 9 inches of wire and then cut it to length when I was done. The yellow lead is connected catacorner to the red lead. The top of the switch is ground so do not bridge the pad with the top. Also from past experience, be very careful with flux around this area since the switch is very sensistive and not air tight. I personally just dipped the tip of the lead in flux and then zapped it with a wet iron onto the pad. I grabbed the ground from the on/off switch since it was easier to access. Clean the area when done with an swab midly damp with isopropanol alcohol.
- Red - Shutter
- Yellow - Focus
- Red/Black - Ground

Inspect your work with a microscope of a loop. Thx to Blue Skies Mag for the pimp shirt!

Tack down the rework like so to allow the switches to work and all the mounting points to fit properly. Use a small drop of crazy glue on a tooth pick to tack them down.

Route the wires like shown on the back side. Notice the tack on the metal away from the mounting hole. Then fish the wires to the bottom with a piece of wire acting like a fish.
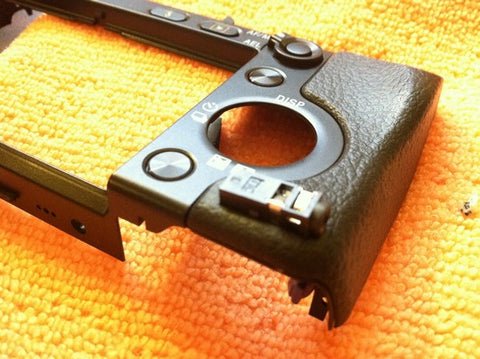
Then cut off the back boss off of the 2.5mm connector's base. (Boss is the little round tab that does not make it sit flush) By keeping the front boss, this makes the connector angle slightly out of the hand grip.

Then cut a rectangular recess in the hand grip with an exacto knife as shown. At the same time I marked in the plastic underneath the grip where the connector would sit. Be careful not to put too much force on this assembly as there are tiny tabs underneath that you can easily break. I then pulled up the grip and cleaned off the double sided tape where the connector would sit with some alcohol. Be careful not to get it in the slot where the blue battery release pivots, crazy glue the connector on the grip. Be sure to mount it so its angled up to allow a 2.5mm plug to be seated without bottoming out on the grip. Then mix up some plastic epoxy and glue the connector down permanently. Again, make sure not to get any in the connector or the blue battery pivot point! Let this dry for a few hours.

You can see how the wires come out the bottom. At this point, push them in and give them a bend (not a crease) so you can easily slide them in the void when putting the back onto the camera.
I guess I missed taking a picture of this, but once the glue is dry drill a tiny hole just above the connector and just below. Then fish the yellow wire (focus) on the bottom hole and the red (shutter) and red/black (ground) on the top hole.

The yellow(focus) goes on the ring (center contact/far side in picture), black/red(ground) on the sleeve (closest side, next to hole), red (shutter) on the tip (closest side, next to the back).

(From http://www.doc-diy.net)
Put the back, back on by first putting it over the screen and then feeding the excess wire back into the void. Take your time and check the battery compartment making sure the excess does not go into there. Go slow, and you'll be able to route the excess just fine. The back just slides in and the only hold up may be the small tabs that fits in the battery compartment recesses.
Don't screw anything back on yet. Reconnect the top flash connectors to the top assembly. Next slide the FPC cable back in using your tweezers on the tabs. Pressing it in will crease it and ruin the camera. USE THE TWEEZERS a little at a time! The top just slips in
At this point, test the camera and your new connector. Focus connected to ground makes the display text go away, shutter to ground obviously fires the camera. If everything is right, the camera will work just fine!
Screw everything back together in reverse. Finally, tack back down the rubber grip with some crazy glue or rubber cement and notch the grip (see below) to relieve stress on the connector when a switch is plugged in.
Hope this works out for you. Please use your time and obviously HYPOXIC and/or Mark Kirschenbaum are not liable for anything you do based upon my instructions.

Sony NEX-7 with a 2.5mm jack


Share this post
- Tags: Hack, NEX, Still Camera

